Monday, October 31, 2011

{RE} Done

i have a friend who sells Premerie Jewelry. each year she puts together a little sale and asks other "vendors" if they would like to join her and be a part of it. i said yes this year after being inspired by so many Pinterest ideas. i also knew of another very large sale in greeneville and i thought if i was going to make enough for one, i might as well go all out and do the big one as well.

this past weekend was my first show. i have named my booth {RE}Done, because everything is redone, remade from recycled items. here is a what my space looked like. my hubby is SO talented. he came up with the set up and it is all something i can do on my own to set up and take down.


i had yarn wreaths with tshirt flowers and cereal box leaves


i made cards from cereal boxes and fabric scraps
chicken wire frames that you can use as a memo board, hair bow holder, a place for recipes or christmas cards...the options are endless
i made a few fall and christmas buntings
chalk boards from old thrifted frames, repainted.
up cycled serving platters made from candle holders and vintage plates... also some of the smaller ones are great place for your watch and jewelry on your night stand or in the bathroom.

upcycled tshirt scarfs! i just love these and how each one is so different.

shelves made from pallets. these are great for book, plates, picture frames, wine bottles... whatever you like to display.

my biggest sellers this past weekend were the chicken wire frames and the tshirt scarves.... the big sale is coming up this weekend! so i need to get myself off this computer and get to work. so excited for the things that sold and hope to sell lots more this next weekend.

Thursday, October 27, 2011

i pinned it, i did it- birthday edition

Pinned Image
these sweet cupcakes from pinterest are what inspired brennas 4th birthday party. we call her "B" all the time so i thought it was fitting and it also looked pimple enough to do on top of halloween costumes and preparing for the crafts sales these next two weekends. i have to say, i thought they were going to be super easy and no big deal... not the case. these babies were destined to melt and be dropped from the get go. before i get into the gory details of the cupcakes i will share some photos of the party.
my version of the the bee cupcakes
the table before they all toppled over :)
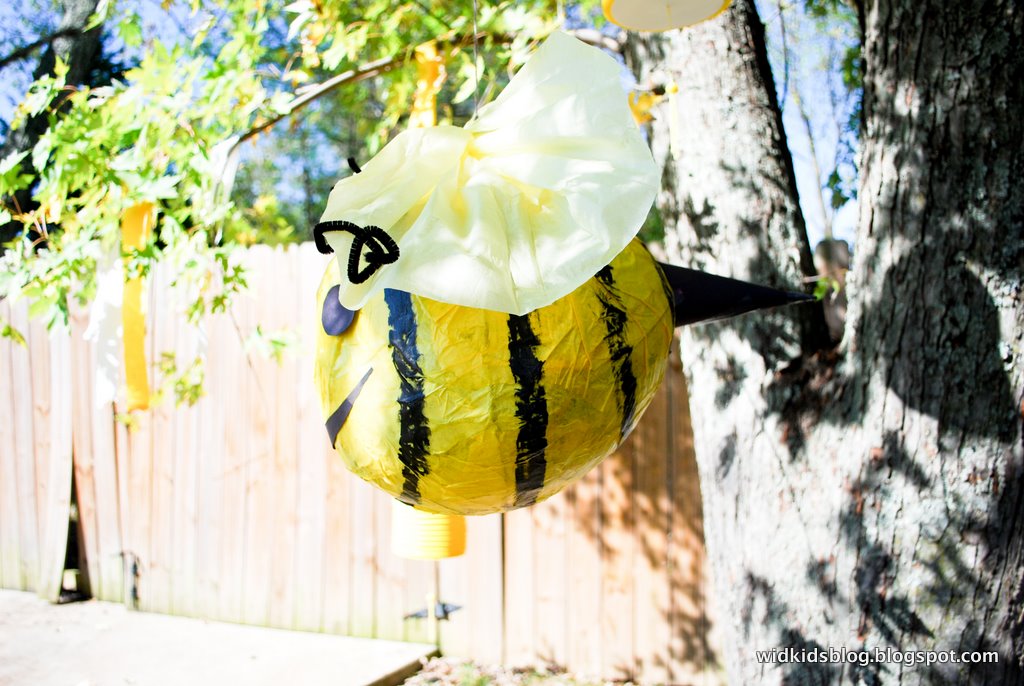
bee piñata made from a ballon and paper mache... you can read about how to do it here, when we made a piñata for easter one year.
the piñata was almost a disaster as well as it fell apart before i even painted it. i waited until the last minute and didn't have enough layers on it. however, somehow it turned out perfect. it was strong enough that everyone got to swing at it three times and it even looked cute :) this was brennas one request for her party so i was determined to make it happen , even if i was up way to late "making it happen".
we did bumble bee crafts... here is a link to the original idea.
we sang happy birthday
she blew out her candles
we had a silly string fight :)

she opened gifts
was super excited about her pink horse. :)

even with the cupcakes melting all over the place and then tipping over, we had a great time.

TRIAL and ERROR beehive cupcakes:
i tired to be prepared ahead of time (a little) and get the cupcakes done the night before the party. i tinted some white icing to give it a golden yellow look, then i made my own pastry bag out of a sandwich bag and piped the yellow icing in a circle onto the cupcakes. it was pretty simple, but not as pretty as the tall original photo. i tired to find out how they made their bees and it seemed like everywhere i looked i was coming up with gum paste or fondant and i didn't want to get that involved in making them. i thought yellow jelly beans and black icing would work. since halloween is right around the corner, i was able to buy a little tube of black icing. i was still stumped on the wings and then i remembered we had some saltwater taffy in the cabinet. so i went to work squeezing out tiny black stripes on tiny yellow jelly beans, then i pinched out white wings from the taffy and carefully added them to the bees. after the bees were complete, i oh so gently placed them on the "hives". not hard but very time consuming. i had to make about 20 bees. i went to bed feeling pretty accomplished but when i woke up in the morning i found my hives sunk down and the bees wings completely melted away. not sure why this happened but the taffy just pretty much slid right off the bee and down the hive. i had to come up with another idea. i had a roll of crate paper for decorating and just took a little piece of it, folded it into wings and stuck it to the melted taffy. worked perfect! i was thankful. i was about ready to take all the bees off and just add sprinkles to the cupcakes, which would have been completely fine if the paper wings didn't stick but i was glad they did.

then it came time to bring them all outside and set the table. on the way out the door, my assistant carriers, my husband and brother, each dropped a cupcake! it was a beautiful sunny day and about 20 minutes after everyone was here the cupcakes were melting so badly. then right before we were going to sing happy birthday, garret knocked an entire plate of them down. like i said, they were destained to be a mess. hey, all is well, we found the best looking one, stuck some candles in it and sang. after all they still tasted good :)

so thats my story for this week. moral of the story... pay a professional to make bee hive cupcakes for you if you want them. :)

thankful for:
a husband that can keep me laughing when things seem to be falling apart
a little girl that is full of life and personality
friends that help us celebrate milestones in our children's lives
God filling my head with ideas of ways to fix problems
beautiful weather for the outdoor party


Wednesday, October 26, 2011

ww- party time

more party pictures coming soon

Monday, October 24, 2011

birthday girl

last friday was brenna's birthday. she got a great package in the mail from gram, papa p and kenzie, filled with lots of fun things and brand new dress from gram. i had about 20 minutes before we were going to have dinner as a family for her birthday and i wanted to grab a few four year old photos of her. i knew she would not be as cooperative as raelyn was when she was four and i did a "photo shoot" with her. but i still wanted to try. she did good. with the little time we had, i think i got some shots that really represent who she is and her little personality. to see more click here.

Friday, October 21, 2011

she's four today!

i have a hard time even comprehending this really. how did it happen? this last year has FLOWN by. i remember as a kid, feeling like the time went so slow, but my parents always commenting on how fast it was going. i think the older i get the faster it seems to fly by.

i have very vivid memories of going into labor and my delivery with my brenna. it was a truly amazing experience and one that i will treasure for a long time. the lord helped me deliver brenna drug free and with control. those memories of that morning are so crystal clear to me. however, many other memories are not so clear. it is hard to believe i started this blog when brenna about about six months old. i love looking back on some of the posts and rereading them and looking at the pictures... one of the benefits of the blog. it is great record keeping. i am my family historian. i like that! but just counting on my memory of events would be terrible as i have a really hard time remembering things the older i get as well.

i wanted to share a few photos of our sweet girl growing up:


i just can't believe how much more grown up she looks now this year. she has always had such cute chubby baby cheeks and they are starting to disappear and are begin replaced with a big girl face. brenna makes us laugh all the time and knows just how to do it. she is by far our "funny" child. she also is very determined. she wants to be a big kid so badly and do all the things her brother and sister do. she gives the most incredible smile when she is proud of herself about something. i just love it. she beams. she loves going to AWANAS and learning the verses in her Cubbies book. she loves to color and pretend to write notes to people. she loves to play horses and will ask you all day long to go up stairs and play horsies with her. she is strong, but a little clumsy. she is still a thumb sucker.

brenna, we love you so much. you makes us smile and laugh all the time and bring sunshine to our days. we are so proud of you.

looking forward to celebrating all weekend with you little girlie. love ya lots!


Thursday, October 20, 2011

thursdays...i pinned it, i did it


YOU and ME frame:
the picture above is my original pin from interest. click here to take you to the crafty lady's blog with the great idea in the first place. I'm just the copy cat :)

Here is what mine turned out like. As usual, i did things a little differently than above. I painted my words on a piece of masonite. I think she used letter she bought from a store. Great both ways. I love it so much, might make one for myself.

What you need, to do it the Wid Kids way:
old frame- i got mine for .50 cents from thrift store with no glass in it.
paint for the frame- i used a light blue and then antiqued it with a watered down dark brown paint
paint for the wording- white
masonite cute to size- have a really handy hubby for that
print out of your letters
paint brushes

What to do:
1.) paint and antique the frame - to antique my frame all i did was water down some dark brown paint and quickly went over my DRY blue paint. let it sit for just a few minutes soaking down into the cracks of the frame. then take an old towel and quickly wipe some of the antique wash back off. you want to leave it in the cracks. pretty simple! and i just love this look.
2.) i picked a font and designed what i wanted it to say in photoshop then i printed it out.
3.) using another trick i learned from interest, i printed the words in REVERSE and then laid them on my masonite and used a wet sponge to transfer the words onto my board. i can not paint fonts that pretty free hand. this was a great little trick. it didn't completely transfer but it did enough for me to trace back around it with a pencil.
4.) paint your letters with white paint
5.) after this step o felt it looked a little to "crisp" for the look i was going for so i just took a DRY brush with just a little paint on it and rubbed it all over the masonite. i went a little darker in the corners but purposely went over the letters a little too so tone them down some.
and now your finished!

i feel like I'm not very good at tutorials. does that all make sense? if you want to do this project and have a question, just leave it in the comments. i'll get back to you.

Tuesday, October 18, 2011

lynnsey and aaron...18 days

check out more pics of lynnsey and aaron.... only 18 days til Wedding time. love you guys!

make sure to come back thursday and see my "i pinned it, i did it" wedding gift i made for them.

cool!

look at what i came across today.... my "command center" featured on Babble for a post about kids chore charts. so fun!

you can check out all the cool ideas here.

Thursday, October 13, 2011

thursdays...i pinned it, i did it

todays "pinned it, did it" was a fun kids fall project that we did on their day off of school. i think i am really going to love having some of these "pins" for this winter when we have some snow days, I'm sure.

so anyways, we made these pumpkin pictures. below is the picture from my original pin. you can click here to follow it back to the original website.
Pinned Image

what you will need to get started:
-CLEAR elmers glue
-black construction paper
-oil pastels or artist chalk (raelyn had some that came in an artist kit she already had) I'm sure you can use regular sidewalk chalk but colors won't be as vibrant.

1.) start by drawing your pumpkin on the black paper with a pencil. use contour lines to show that the pumpkin is round. we added grass, a moon, and a curly vine.
2.) next take your clear glue and trace over your pencil lines. garret (8) and raelyn (5) did their own glue lines and did a really good job. i helped brenna (4) with hers.
the above picture is of brennas pumpkin. she did a really great job drawing it out.

3.) the next part is the difficult part..... you have to WAIT for the glue to dry. this took most of the day for us actually. so just let the kids know in advance that it takes a while for the glue to dry. might even be better as a two day project.
4.) once glue is dry, use your oil pastels or chalk to color in your picture. we worked on blending colors by smudging the colors with our fingers.

above: garrets finished masterpiece
above: raelyns finished masterpiece.

brenna was napping while we finished ours so she didn't get to color hers in yet. but i can't wait to see she she comes up with.

i love how they turned out. the kids had a great time doing them. maybe ill frame them and pull them out each fall.

thankful for:
little fingers all shades of blue and orange
for kids that love to do projects... makes my heart happy
seeing a sense of accomplishment on their faces

Wednesday, October 12, 2011

a girl after my own heart

it must run in the family... mom loves shoes, i love shoes, kenzie loves shoes and now jori loves shoes. whenever we are in her room she goes to her shoes and her books. equally important things :) she brings me shoes and sits in my lap until i put them on her. usually not matching.

when dave and i got married i got rid of a TON of shoes. he teased me all the time about all the shoes i had. well recently it seems i am slowly building my shoe"collection" back up. just last week i got two new pairs thanks to the new GoodWill that opened up. yeah! for shoes, yeah! for bargains.

thankful for:
little things that make me remember my family
jori making me laugh
good bargains
hand me downs
a camera that allows me to freeze all these little images in time

Monday, October 10, 2011

camping old forge

the kids had a few days off this week so we planned a camping trip before the weather got to freezing cold. the friends of ours that we went on our summer vacation with, joined us as well.

the men were doing most of the planning. and i was having a hard time finding a sitter for jori, so i was just going to come for dinner sunday night and then head home with the baby. well my niece came to the rescue and stayed with jori sunday night at our house so i could go too.
this was the drive up to the campsite. so pretty as the leaves are starting to change.
this is just PART of the stuff we brought. A LOT of stuff for one night, thats for sure.
above is our campsite. perfect for two families, 4 tents, 5 children, lots and lots of blankets, yummy food, fun times around the campfire, and a awesome creek right behind it.
the kids looking for crayfish. they actually caught one and ate it! dave said he would cook it up if they all took a bite. it was pretty small so by the time they cleaned it and cooked just the little tale they all got a bite about the size of a pea. they were troopers to try it :)
there is this cool little natural swimming hole right there as well. too cold to swim in now but probably an awesome place to cool off in the summer.
we had a great spread of food while there. burgers, dogs, corn for dinner. cooked banana splits (slice a banana down the middle, fill with chocolate chips and marshmallows, wrap in foil and cook in the warm coals.... SO yummy!) and smores for dessert, and for breakfast we had a feast of homestyle hash brown potatoes, scrambled eggs, bacon, sausage, and pancakes! breakfast is my favorite meal and this tasted so good.
reading time with mr. chad.
not a great picture, but a big step in garret growing up. dave gave him the pocket knife that used to be saves, that used to be his dads. the thing is so dull but still good enough to carve sticks and feel important. we are so proud of him and how responsible he was with it.

i have to say there was not a lot of sleep happening for me that night. maybe about 2 hours total. but it was a fun time and I'm glad my kids have a memory of me camping with them as well. dave has taken them a few times but i have never stayed with them overnight.

today we planned on heading to the knoxville zoo but it was raining this morning so we decided to go to the library, get some books and a movie, make some cookies and do a fall art project. i will share the project with you later this week. hope you all had a wonderful columbus day.

thankful for:
new movies at our little library
changing plans and the kids being ok with it
supplies already at home to do a fun project
enjoying an awesome campsite with my family
being able to attending a bridal shower for lynnsey
the rain, even though it changed our plans